Intro to Plastics: Solving Jetting in Injection Molding
Free flow or jetting is a defect associated with poor gate design. It should be checked for as part of any new mold design process.
Jetting is a common defect that arises close to the gate in injection molded parts. It is seen as “free flow” in the molded surface of the part and brings typically unacceptable defects to the part’s aesthetic. Depending on the material viscosity, it can be seen as a “mouse tail” or a bending of the flow, causing small wrinkles on the surface.
How Jetting Occurs?
Jetting occurs because there is a large difference between the gate thickness and the part thickness. When the material enters the mold, it does not hit any wall but fills the cavity freely. This is very similar to the effect you find when toothpaste fills a glass.
This free flow effect generates a non-uniform filling; the part should always fill following a circular pattern, where the gate is the center and the flow expands uniformly. But for this to happen, the flow must encounter a wall immediately after entering the cavity, and this wall should drive this first material flow inside the cavity.
A Mindful Gate Design

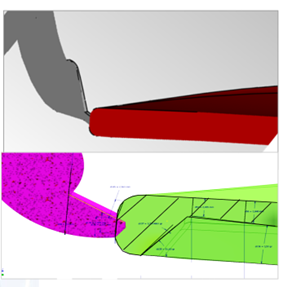
Recommended gating configurations to avoid jetting.
So, the first way to avoid jetting is to mind the gate location and make sure that the flow front has a guide as soon as it enters the cavity. Several gating recommendations give alternatives to avoiding free flow inside the cavity. The figure above gives different examples, where the flow first hits a mold wall, and from there, expansion starts.
Notice that shooting the flow parallel to the mold wall is a poor design. You want to make sure that the flow front has a controlled growth pattern, and it makes sense to always freeze it first into some sort of a “coin” and then allow flow expansion in circular patterns.
When placing the gate over the molded part, imagining how these critical first moments of flow-birth will occur is always important. Simulation is a great tool for this, but it is essential to have a flow solver that can simulate free flow and know what to ask. Also, to resolve simulation in a very small time-step, able to describe the complex solution from the point of view of fluid mechanics. The German software Sigmasoft can describe this kind of phenomenon.
Sadly, as a molder, you usually only become aware of the defect of jetting once you see it for the first time – in a mold, you are starting. So, as sometimes it is, you must learn the hard way. Correcting the defect always involves changing the gating position to lead flow front inside the cavity.
Jetting Solution Through Process Control
You will find some recommendations in the textbooks to reduce injection speed and increase melt and mold temperature to reduce jetting. However, from my own experience, I can say that the scope of these process modifications is rather limited.
I belong to the population that learned about a defect called “jetting” by first encountering it in a mold that we should get into production. As always, the mold was already there, and we needed to get products into the market two weeks ago. So we tried every possible combination of process parameters with little success. The only thing that solved the problem was changing the gate shape.
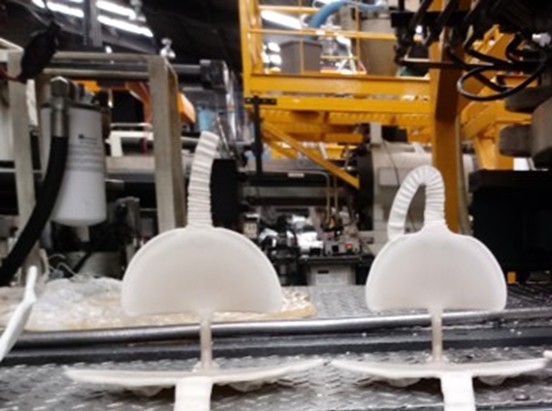
To avoid jetting the melt entering the cavity, a wall should always be encountered that guides flow growth in a laminar pattern—image: PM Tec Engineering.
Nevertheless, I have encountered that increasing melt temperature and reducing very sharply injection speed right at the gate (down to 1 or 2 mm/s) may improve the surface marks associated with this defect. Of course, this has unwanted consequences over cycle time and should, therefore, only be used as an emergency solution. The real solution should come from modifying the gate and mold wall geometry.
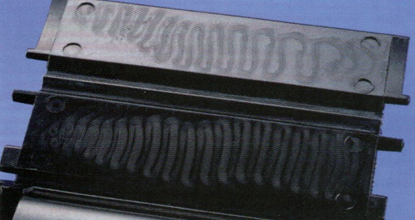
Above: original gate design. Below: Final design. Courtesy of PM-Tec Engineering.
In our company, we did a study to solve jetting in a component with 15% GF-PP (Figure above). The solution involved several iterations, and the final solution involved modifying the mold cavity, ensuring that the melt hit a mold wall when entering the mold.