Optimizing Cycle Time in Injection Molding: Tips and Techniques

Look for opportunities to shorten each step of the molding cycle. To understand these opportunities, learn how the material behaves inside the mold.
Minimizing cycle time is essential to increasing the profitability of any injection molding process. A molder’s ability to compete is proportional to the number of good parts made in each shift.
You can also read: Two Ways to Reduce Energy Consumption in Injection Molding
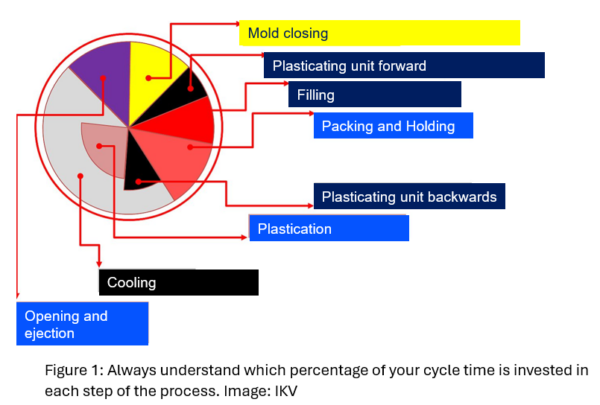
The first step to any optimization is to assess each stage’s duration within the molding cycle. Molders often know precisely what their part’s cycle time is but do not know how this molding time adds up.
Simple information goes a long way, such as how long the volumetric injection phase lasts or whether the cooling time is efficiently timed. To optimize the cycle time, paying attention to each cycle phase and reading the machine’s response to each of the parameters you set up is important.

Injection molding stages. Courtesy of IKV.
Filling Time, Not Just Pressure
The volumetric filling should encompass 90 to 95% of the component—or up to 98% for thinner parts. You should fill thinner components more quickly. Ensure the process isn’t limited by pressure, as reaching the pressure limit during the filling stage slows cavity filling Then, always set the velocity to the maximum attainable without inducing shear degradation.
Holding Time and The Dimensional Stability
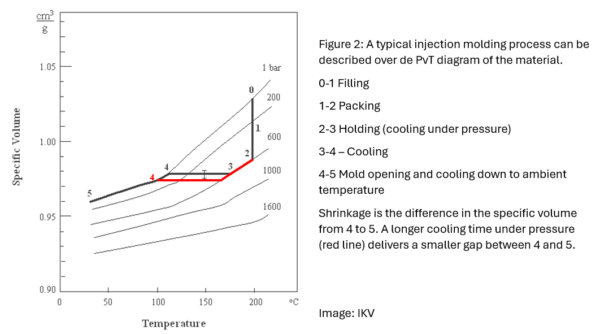
This is the most compelling part of the cycle to ensure dimensional stability. Because material always flows inside the part, packing can be thought of as “cooling under pressure,” this cooling is much more efficient at reducing shrinkage than the residual cooling afterward.
When following the injection cycle in the PvT diagram, it is possible to see that increasing packing time will lead to lower shrinkage. This means that you can increase holding time and decrease cooling time to achieve the same amount of shrinkage. Try this very effective trick: replace two seconds of cooling with one extra second of packing and get an overall lower cycle time without affecting part quality.

PvT diagram. Courtesy of IKV.
Cooling Time: Plasticating and Machine Recovery
This time, counted from the moment you finish packing, coincides with the plasticating and machine recovery. The component should always dominate the duration of this step: if you have reached your cooling time but the machine is still dosing, you should change the machine to a larger one.
With that said, three factors affect the heat transfer process during cooling: the ability of the material to release heat, the ability of the mold to transfer heat, and the temperature at which you can eject the part.
From the polymer point of view, you can reduce cooling time by selecting a material with high thermal conductivity and high thermal diffusivity; this will increase the heat removal rate. It will also be wise to choose a resin with high HDT (heat deflection temperature): in this case, you can eject it earlier, at a higher temperature, as it will reach dimensional stability at higher temperatures.
From the side of the mold and tempering system, you want to increase the heat transfer coefficient. You can reduce cooling time by selecting alloys with high thermal conductivity. It is also essential to always work with tempering channels as close as possible to the mold and remember that you have enough area in the channels to evacuate the heat transferred by the polymer. Also, make sure that the water flowing through the tempering channels is always in a turbulent regime, as this will increase the heat transfer.
Ejection- End of The Cycle
One of the most common mistakes in injection molding is having an opening stroke larger than needed to eject the component. Sometimes, you may lose a couple of seconds by opening far too wide the two mold halves. Always check that the stroke is only as wide as needed and that you do not waste several ejection repetitions unnecessarily.
